
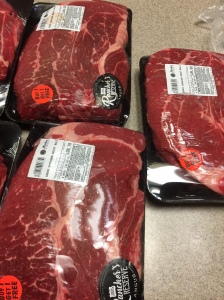
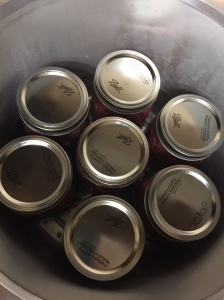
Market Street had their Rancher’s Reserve Chuck Roasts on a BOGO this week, so I just had to go. Why only 7 roasts, you ask. Mom’s Birthday Dinner was yesterday so we just had to fix a sample! It was delicious. I expect to get 14 quarts from the 7 roasts (each quart will hold approximately two pounds of trimmed meat). A Pressure Canner MUST be used for meats!! You will find links for my favorite products used in this project at the bottom of this post.


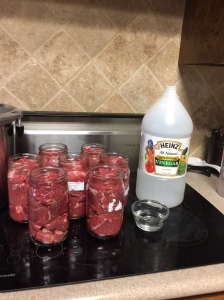
Once you have your jars packed, you may add 1 tsp salt or bouillon to quarts, 1/2 tsp salt or bouillon to pints (I don’t – I like to control sodium in our food). You may also add any spices of your choice with the exception of sage. Sage tends to turn rather funky in the canner and who wants to spoil that much meat? Above you will see my 7 quarts with a small dish of white vinegar.


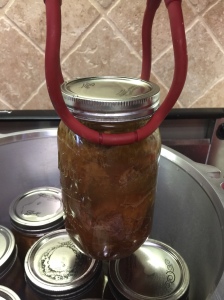
Dip a paper towel in your small bowl of vinegar and clean the rims of your jars. Any fat or residue left on the rims may prevent a good seal, so you don’t want to skip this step. Add your lids and rims and close finger-tip tight. In the second picture above, you see me adding the remaining vinegar into the canner. This helps to give you nice, clean jars when you remove them from the canner. Without the vinegar, your jars may be cloudy. You see my canner full of the 7 quarts of beef roast. To seal an All American Canner, turn the lid into locking position and tighten the toggles opposite each other until all are equally tightened.
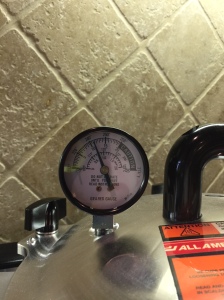
The 4th picture above shows my canner, sealed and heating on high. When the canner begins to vent (you will see puffs of steam coming from the vent), set your timer for 10 minutes. After the 10 minutes of venting, put on your weight at the correct pounds per pressure for your altitude. Mine is 10 lbs.


My All American Canner : http://amzn.to/2C7h3v My Jar Lifter : http://amzn.to/2BCziI9
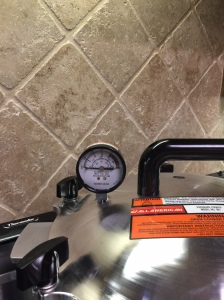
Once your pressure has built to your correct pounds of pressure, reduce your heat and set your timer. Quarts will take 90 minutes and pints will take 75 minutes. Keep an eye on your gauge throughout your canning session to ensure you do not go below your required pressure. You can go over by a bit (not too much), but if you go below, you need to bring the canner back up to pressure and start timing again. This can result in overcooked product and can easily be avoided by checking periodically.


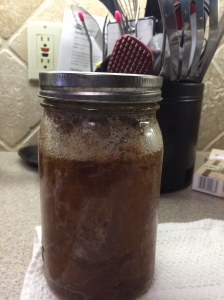
Once your canning time is up, move your canner off the heated burner and allow the pressure to release on its own. DO NOT remove your weight gauge or attempt to open the canner at this point – it is still pressurized. It should take anywhere from 20 – 40 minutes for the gauge to fall to 0. Once it has lost all pressure, you may remove the weight. It might hiss a little bit as the very last bit of pressure exhausts. However, if it hisses angrily or the gauge begins to climb, put it back on for another 10 minutes. When you are able to remove the weight, start to open the opposite toggles until all are released. Rotate the lid to release and open the canner by raising the side OPPOSITE from where you are standing to avoid getting steam burned. If your house is kept at cold temperatures, you should consider waiting another 10 minutes prior to opening to reduce the chance of shattering your jars. As you remove your jars from the canner, be sure you are connecting with the glass jar, not the metal rim. You are likely to see the broth inside still boiling. Place jars on a double thickness of dish towel away from drafts and leave alone for the next 24 hours. Then you will be ready to remove your rims, wash your jars, date and label them and then put them away. The following is my second canner load – can you see the broth boiling?


When you are ready for a quick meal that tastes like you’ve been working all day, just heat the roast, maybe with some carrots and potatoes you have also canned ahead, and enjoy. That’s what I call healthy fast food.
My All American Canner can be found here: http://amzn.to/2C7h3vs
My Jar Lifter can be found here: http://amzn.to/2BCziI9
Disclaimer: I have done a lot of my own research on the internet, in books, and with the book that came with my All American Canners. Readers are advised to do the same. I do not present myself as a professional or authority, but as a fellow laborer who is sharing how I do things and what works for me.
You must be careful to follow the instructions for your own canner and use the weight appropriate to your altitude. Pay attention to the canning times as well. They can vary, depending on the item(s) being canned. The majority of low acid foods like meats, beans, and vegetables, however, require 90 minutes for quarts and 75 minutes for pints.
I encourage all readers to do additional research on this topic if you are not experienced in canning.
© Lone Star Bluebonnets | All Rights Reserved
